
Welcome to Ghost In The Embroidery Machine, where you’ll get all the tips and tricks you need to become a dynamic digital embroiderer, thanks to the wit and wisdom of Erich Campbell!

Using your Sewing Machine and Puffy Foam to create a 3d Foam Embroidery is a great way to take your Embroidery Design skills to the next level.
As a commercial machine embroidery digitizer, the use of 3D foam has been a subject I’ve been reluctant to teach, due to the fact that few agree completely on how files should be prepared to achieve the best effect.
The well-worn adage I’ve coined is, ‘Ask three digitizers how to design for foam and you’ll get five answers.” The truth is, there are many ways to approach 3D foam embroidery and more than one method has been shown to result in a clean, dimensional design.
For that reason, I won’t claim that my technique is the only one that works, rather, only that it is one that has worked for me. Before we get into my technique, however, let’s start be laying down a few basic definitions and truths about 3D foam designs.

What is 3D Foam?
3D Foam is an ethylene vinyl acetate material made specifically to create dimensional embroidery. You place the foam on the surface of your work piece, stitch through to perforate it, and finally tear away the excess from non-design areas. This leaves the foam under the thread of the design, raising it well above the ground.
For the best results, I use high density embroidery foam. Though craft foam is similar, some foams may be layered with meshes, films, or other materials that will inhibit perforation, and craft foams are usually less dense and thus more prone to being compressed, leaving you with a less dimensional result.

How Do You Embroider On Foam?
3D embroidery on foam requires almost twice the density of stitches you would use for full coverage in a flat embroidery design in order to perforate the material and hold it under the stitching securely. This can negatively affect your results so it is not ideal for all digitized design projects.
Moreover, any open ends on satin stitch columns require a ‘capping’ stitch below the top stitching to hold in and perforate the puffy foam. For the best, most dimensional results, you need to either purchase foam-specific designs or use software to digitize your design specifically for the medium.

What Designs Work Best With 3D Puff Foam?
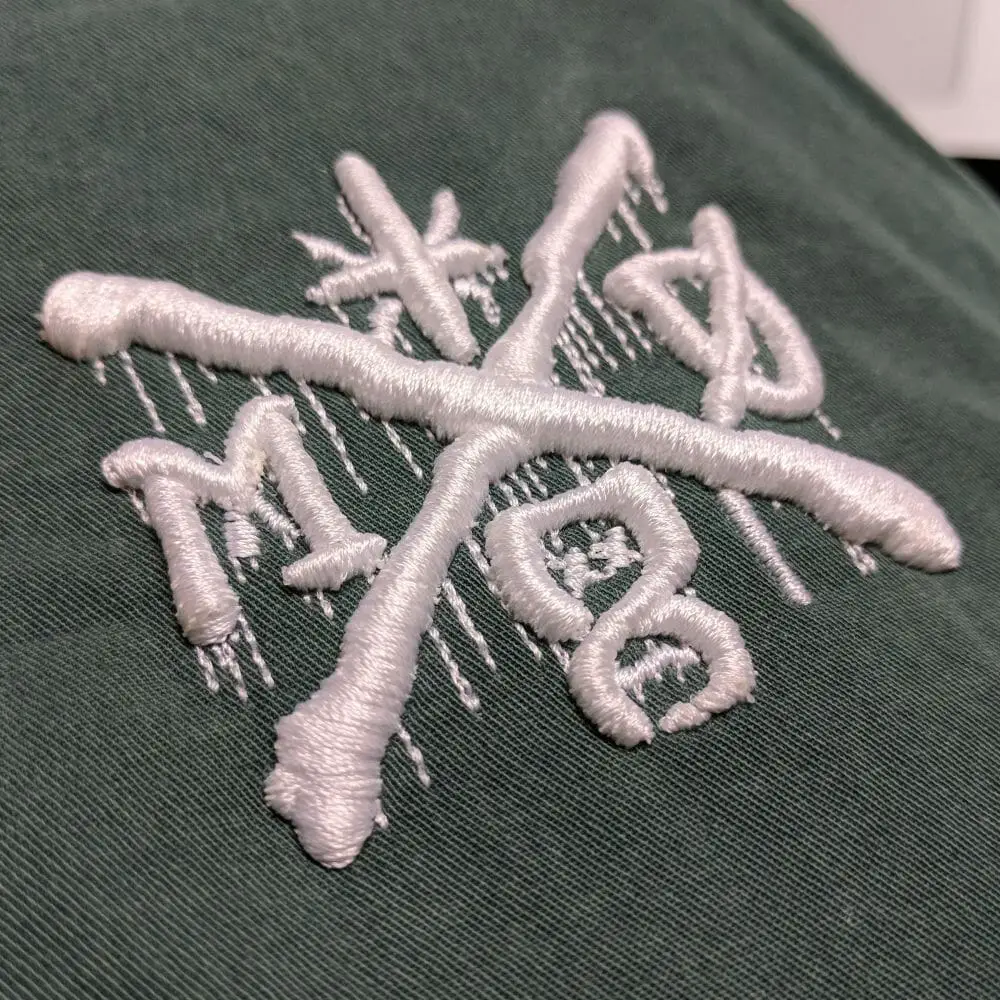
Designs with bold, wide satin stitch columns, like a large satin stitch font, allow for the most dimensional embroidery using 3D puffy foam. The long, loose stitches allow the foam to remain high and uncompressed.
Though you can use fill stitching to cover 3D embroidery foam, it compresses the foam more than satin stitches for a shorter ‘crown’ to the design.

How Do You Plan Machine Embroidery Designs For 3D Foam?
- Increase Stitch Density
- Carefully Balance Stitch Angles
- Pre-terminate Your Columns
- Use Foam-Specific Underlay
Here’s where we get into my particular technique; your mileage is highly likely to vary.
Increase Stitch Density
I use around double the standard coverage density you would expect for standard flat embroidery. For 40wt threads, that’s between .17mm and .25mm, or 1.7 and 2.5 points. This can vary somewhat depending on color contrast between your top-stitching thread and the color of the foam and how cleanly the particular foam perforates. Always try to match the color of the foam to the thread where possible to reduce how much it shows through your design; this can allow you to slightly reduce densities.
Carefully Balance Stitch Angles
To maintain tight, even stitches, the angle of your topstitching should be as close to perpendicular to the edge of your satin column as possible. That said, when turning a satin around a curve or corner, you will have to balance between keeping that ideal angle with the increased density that occurs on the insides of curves.
If your satin stitch gets a bunched texture or thread breaks occur inside curves and corners, make the transition of the stitch angles into the corner more gradual, spacing out the inner points of the stitch angles as you turn. If you don’t mind some texture on the inside of your curves, you can use automated stitch shortening, so long as you check to make sure your inner edge has even coverage and enough density to perforate the foam.

Pre-terminate Your Columns
There are two methods for cleanly finishing a satin-stitch stroke: Capping and Angled Points.
When you ‘cap’ the end of a stroke, a satin-stitch cap is stitched during the underlay run to cut and cover the foam at the open end of the satin stroke, as discussed later in the ‘Underlay’ section.
If you use angled points, the beginning and end of each shape tapers to a small stitch on a corner, so that every edge of the shape is on the full-density cutting edge of the top-stitching satin column. This can be easier to maintain than capped open ends, but tends to distort the shape due to pull and push distortion acting on the odd stitch angles required to maintain a cutting edge on all sides of the element.
Use Foam-Specific Underlay
I don’t use underlay to pre-cut foam before top stitching due to the chance that edge underlay stitching can sometimes ‘peek’ out of the top stitching as the edges. I travel through my design using long, manual zig-zag stitches, stopping to terminate strokes and attend to junctions between satin elements.
Here are a few things you’ll need to create during your underlay run:

- Planks: Place long, manual stitches that zig-zag over any place where two satin columns meet to hold foam together as it is perforated by the topstitching. This also keeps top stitching from falling into cuts in the foam and from separating the stitches of the underlying column.
- Caps: Place satin stitches across the open ends of satin columns, with one interior jagged edge. This ensures that only the ‘outer’ edge of the cap perforates the foam for tearing. Make sure the ‘cap’ extends beyond the last stitch of the satin topstitching, up to .5mm, to account for push distortion and to avoid the topstitching ‘falling off’ of the ‘cap’.
- Points: Small, arrow-like ‘points’ composed of a few stitches lining up in the tiny open end of a pointed stroke can help to perforate the small foam bits that can sometimes remain after removal. These can also be used in the corners of an open stroke next to the usual ‘cap’ to enhance edge perforation.

- In-column Planks: When the exit point of a satin column is placed in the middle of the column rather than the end, foam may stick out where the two sections of the satin stitching that make up the column meet.
Creating a long zig-zag underlay element with both sides jaggedly edged across this area can help hold down the foam and lift the top stitching in the overlapping area.

- Corner Covers: When there is a sharp corner or a pointed element on the edge of a column, the corner of the foam under the stitching can ‘poke through’, separating long, loose stitching above. By creating a manual zig-zag perpendicular to the top stitching, you can hold down that corner before the foam is perforated, arresting this ‘poke through’ and supporting the top stitching.

How Do I Get A Clean, Smooth Finish On My 3D Foam Embroidery?
There are two useful methods to getting that clean finish on your foam embroidery:
Apply A Little Heat
Carefully apply low, indirect heat using an inexpensive heat gun, embossing tool, or a hair dryer to reduce any small fibers or bits of foam that remain on the design’s edges after excess foam is torn away.
Take care with heat-sensitive or light colored fabrics and threads, and with the type of thread used; polyester can melt and light colors can scorch should you apply too much heat or apply heat for too long. Start several inches away from the design and keep the heat source moving.
Try some ‘Mechanical Intervention’
It’s OK to poke in a small, errant bit of foam to keep it in place. Use a blunt instrument that won’t damage thread to poke the foam back under the stitching. If this happens consistently in one area of your design, consider using an underlay or checking stitch angles to correct the perforation and/or to hold back the foam. Often, just lightly rubbing the design with a piece of clean stabilizer or lightly scraping the back of one’s thumbnail across a column can help spread out the thread if you have minor show-through.
CAUTION: Though it can be tempting to use your thread trimmers to poke in these bits of foam, you can accidentally cut those loose satin stitches with the sharp edge of your blade, and we all know what happens when we nick a satin stitch.

Can I Really Do 3D Foam Embroidery On Any Machine?
3D foam can be used with any sewing machine capable of digitizing embroidery, though you may have to slightly loosen your tensions and switch to a medium ball-pointed needle to get larger perforations to get that clean tear-away.
I’ve used everything from large, multi-head commercial machines to the least expensive home machines to create successful 3D Foam embroidery.
Just remember the basics; Cover, Cut and Clean Up.
- Cover areas completely, and use underlay elements to cover and connect troublesome junctions.
- Cut edges with dense top stitching and use caps and points to cut open ends on your satin stitches.
- Clean up your design with heat and a little manual intervention. In the end, you can create designs that make the best use of this massively dimensional material.

(If you’d like to hear more from me about 3D foam – check out this recent webinar where I describe the elements in this article for the commercial market. If you have an hour and want to know what the ‘Ghost’ sounds like, here’s your chance.😉)