
Okay, hands up, who has a fabric stash? Thought so. I think most of us do. I try to be quite controlled with mine. I have a wooden trunk I keep it in, and once the trunk is full I don’t buy any more fabric until I have used some up and created space in the trunk again. But if I see something really different or wacky that rule goes right out the window…
So picture the scene. The trunk is full. I’ve put myself on a fabric buying ban, then I go to visit my friend Angela Hounsell. Angela owns a fabric shop called Craftyangel which is on a beautiful farm in Hertfordshire and is online 24/7 and open to visit at weekends. It’s such a relaxing place to go and sew, if I’m not at my own sewing machine I’ll be at one of Angela’s having a giggle and a cuppa with fellow enthusiasts during her ‘social sewing’ sessions. And playing with Pixel, the coolest dog on the planet who is more than willing to help you with all your fabric needs.

When I walked into the shop recently I wondered why she had started to stock rolls of brown paper alongside the Tula Pink delights and the Art Gallery goodies. You can imagine how excited I was to find out that the paper was in fact a type of fabric – and my fabric buying ban immediately went right out the window…
The Rico Design washable paper is just fabulous so I had to pick up some of the plain brown version. It also comes in really cool gold, rose gold and silver colours. The brown paper comes in a roll measuring 50cm x 100cm and costs £12.99 (available here). Angela explained that it’s like a vegan leather and doesn’t require a special machine, needles or thread to sew with it. And like paper you can glue things to it, draw and stamp inks onto it, iron and emboss it to name but a few techniques! The world would be my oyster, and when you wash it it becomes softer to work with and takes on a more distressed look. I couldn’t wait to get home to play with it.

What would I make… Well, it really bugs me that I never seem to have the right size box to take my lunch to work in. Always too big or too small. And as I eat my lunch time sandwich I often dream of the days when I worked in Edinburgh and sometimes treated myself to an amazing sandwich from the local deli. It was always a special treat, brimming over with tasty goodies, and always smelt so good when I opened the brown paper bag I carried it back to my desk in. So in tribute to my amazing Edinburgh lunches I thought I’d re-create the brown bag from the deli so I can once more take my sandwiches to work in style.
When you unroll the paper it is smooth and flat so I gave it a wash and got it nice and wrinkled to be more realistic as a crumpled paper bag. I cut two pieces of the paper, each measuring 9” wide by 11” long for the outer surface of the bag and two fabric pieces the same size to brighten up the lining of the bag. I then bought some special insulated interfacing from Amazon which cost £5.99 for a pack measuring 27” by 45”. I cut two panels measuring 9” by 11” from it.

Once I had done that I laid two pieces of paper on top of each other, sewed down both sides and along the bottom, leaving the top open. I then made the bottom of the bag into a box, the same way I did in the column earlier this year where I turned a skirt into a bag. Click here to see the method I used. I made the box bottom two inches for this project.
Next I layered up what would be the inside of the bag. To do that I made a fabric and interfacing sandwich. I laid down a piece of the fabric right side up, then two pieces of interfacing on top of each other, and the final piece of fabric right side down. I then sewed along the side of the fabric and 2.5 inches across each side of the bottom, leaving a four inch gap for turning everything the right way around. You need to leave a larger gap than you would using normal fabric because the paper is a bit harder to crush up to squeeze through the gap. I then made that into a box bottom using the same method I had for the exterior piece.

I then turned the outer paper piece the right way around and set it on the table. Then I placed the interior part of the bag inside it, still inside out, so the wrong side of each piece is touching each other. I moved them around until they lined up at the bottom and at the top edge and clipped the top edge together all the way around. If you pin the paper fabric the pin holes will remain in the fabric so using clips is a much better option. (And as someone who always broke needles on pins at school – and very nearly never looked at a sewing machine again because I got into so much trouble over it – I prefer the clips.)

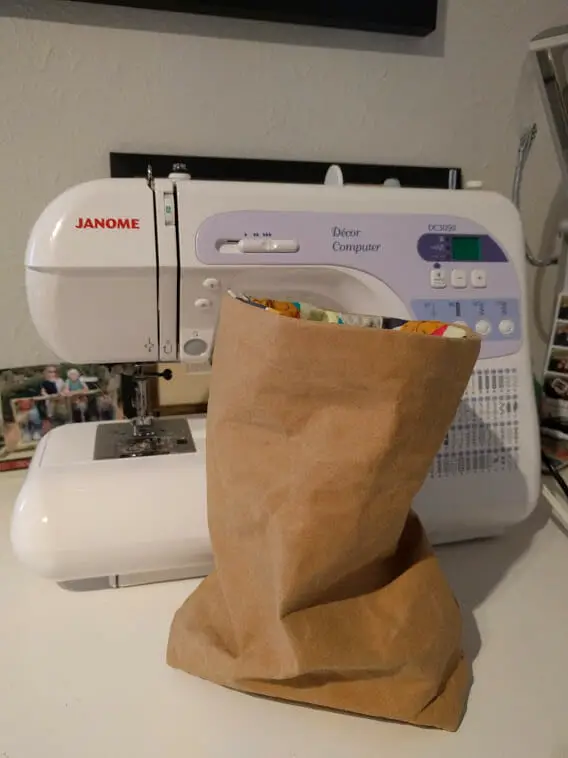
The next job is to sew around the top of the bag so both pieces are connected. Once you have done that turn it all the right way around through the hole you left in the lining. It becomes a bit of a snake…

Now all you need to do is sew up the hole in the lining and it’s done. Perfect to slot your sarnies into – and scrunch down the top like you would when you’re full of excitement rushing back to your desk with your favourite deli shop sarnie. And it’s got a lovely thermal lining to keep them nice and cool. Or keep something nice and hot – whatever you choose to keep inside. And you can wash it and re-use it as much as you like.


Have you tried to sew with this paper before? I’d be keen to hear from you if you have, what did you make? It’s really fun. I can’t wait to make something else out of it. I may cover the house in paper.
Finally I’d like to say a huge thank you to all of you who chatted to me at Moira Calling to find out more about Craft Rocks and the wonderful world of Mr X Stitch. I hope you enjoyed the festival as much as I did. It was great to hear about your craft work – see you again next year!
Best music to paper sew to: Another One Bites The Dust by Queen
Best cake to eat while sewing paper: Victoria sponge
Costs
- Paper fabric £12.99
- Insulation £5.99
- Fat quarter for the interior – free from my fabric stash
- Total £18.98 (and I had lots leftover to make more projects with)