
Having always wanted to learn how to do lino cut printing I finally got to go on a workshop with my crafty buddies a while ago. We had a great laugh learning how to cut into polystyrene and lino to make prints. I opted for a little rocket and a gramophone.

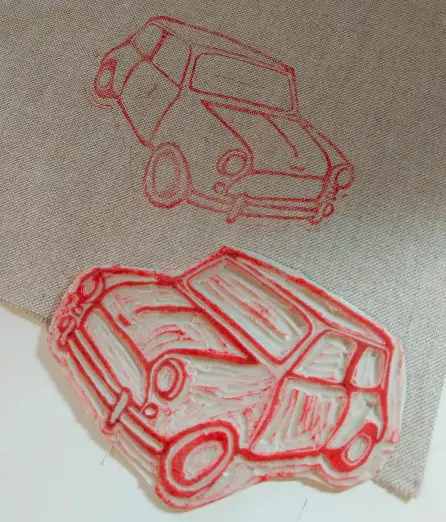
Since then I look at lots of images imagining how lovely they would look printed on fabric and think – well, I can make a lino cut image, so why not make one that will print onto fabric? So let’s give it a go. I bought some the tools and lino, and I decided to make a Mini (if you’ve ready my other columns, that won’t surprise you much…)

First of all I found a picture to replicate and drew the image onto the lino.

Then I got cutting with the finest tool in my kit. It’s important to remember that you need to cut your image back to front so it prints the right way round, and that the bits you cut are the bits that won’t print. Once I had cut it all I cut around the shape.

For ink I used a printing pad I got online. This made it easier to put the ink on the stamp as I just gently padded the ink pad onto the stamp and could keep looking at it to make sure the ink hadn’t gone into any holes. Using a fluid ink would have been harder to manage.

It was quite exciting pressing it down onto the fabric and lifting the corner back to see the finished print. And here it is!

I’m going to use the stamp to make this into a little bag like I did in a previous column (which you can read here) or add some embroidery to it and make it into a Christmas picture. I haven’t quite decided yet.
I’d love to do some t-shirt printing though. Have you ever done that? Or made your own stamps?
Best song: Born to be Wild by Steppenwolf
Best cake: Christmas cake… it’s almost time!
Costs
Lino cut tools: £5.25
Lino: £4.59 for enough to make loads of stamps
Ink: £2.50
Total: £12.34